Best Video Settings for the Fujifilm X100VI
Watch the full walkthrough video here:
If you’re a Fujifilm X100VI owner looking to squeeze the best possible video quality out of your camera, without diving into a mountain of technical details, this guide is for you.
I recently made a video pushing this little point-and-shoot to its limits in video mode. But I know some viewers won’t be interested in sample footage or longer discussions.
That’s why I’ve put out this article & shortened video to cut straight to the important stuff: the exact setup steps for each video setting, with just a touch of context behind each choice.
Here’s how I set up my X100VI to get the absolute most power out of it:
Two Quick Quality of Life Tips
1. Turn On Boost Mode
Start by setting your camera to Boost Mode.
The default “Normal” mode is basically battery saver mode. It holds the camera back to extend battery life.
Boost Mode lets the camera operate at full performance, which is definitely what you want for video, and I simply leave all of my Fuji cameras in Boost Mode 100% of the time.
We want the performance we paid for, right?
2. Switch to Movie Mode
Don’t try to change video settings from photo mode. Yes, you technically can, but switching your Drive Settings to Movie Mode gives you a cleaner, more predictable workflow.
Once you’re in Movie Mode, open your Movie Setting List. This is where the important stuff lives.
BEST Video Settings for the Fujifilm X100VI
Resolution
For resolution, I choose 4K HQ.
This mode downsamples from 6K and gives you slightly better detail. Full 6K is available, but it’s overkill for most people. Heavier files, tougher on your computer, and totally unnecessary for YouTube or social platforms.
Note: 4K HQ applies a 1.23x crop. If you don’t want any crop, use standard 4K, but remember that you’ll lose some of that oversampled sharpness.
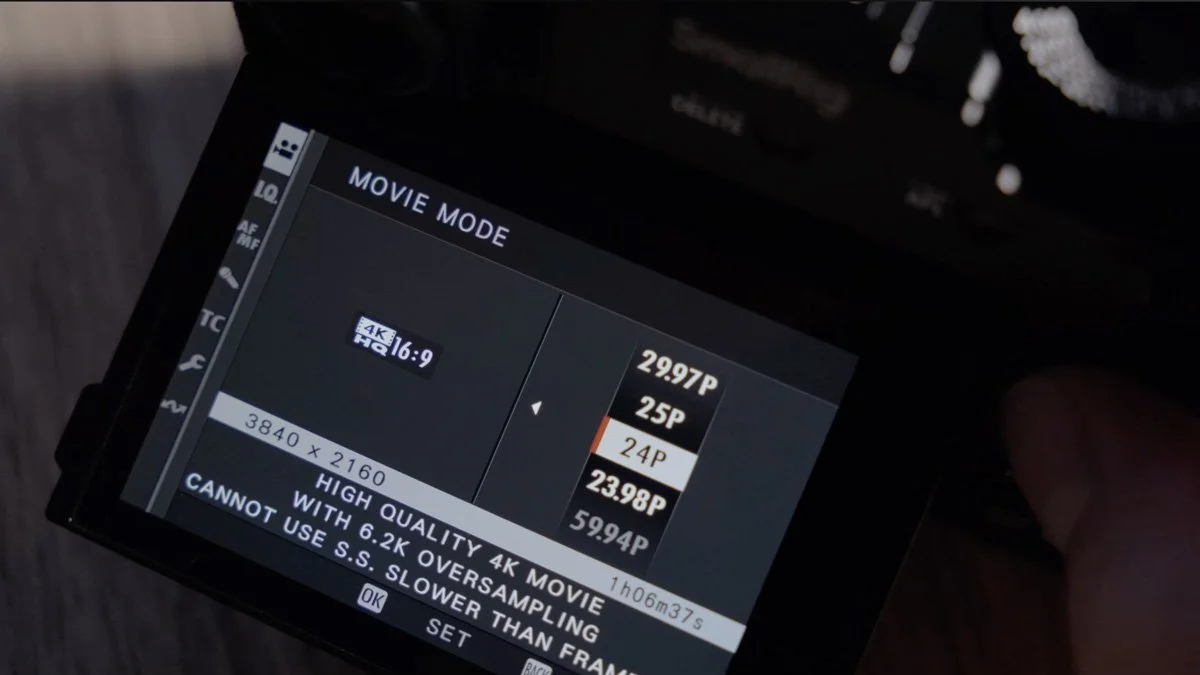
Frame Rate
This one requires slightly more explanation because one setting is not “better” than the others.
I personally use 24 fps for everything. It’s the “cinematic standard” and traditional for movies.
30 fps is also a great option. It can look “smoother” and is therefore often used in TV or social media. It just comes down to personal preference and your end goal. Experiment a bit and see what you prefer.
Unless you want to get slow-motion footage using 60 fps, 24 fps is my recommendation.
On a camera like this that’s not meant to be a video camera, I think picking one setting and committing to it is the best user experience, so I’d recommend setting it once and not touching it.
Bonus Tip (The 180º Shutter Rule)
For the best-looking motion, shutter speed should be double your frame rate.
So for 24 fps, use 1/48 sec. 30 fps, use 1/60 and so on.
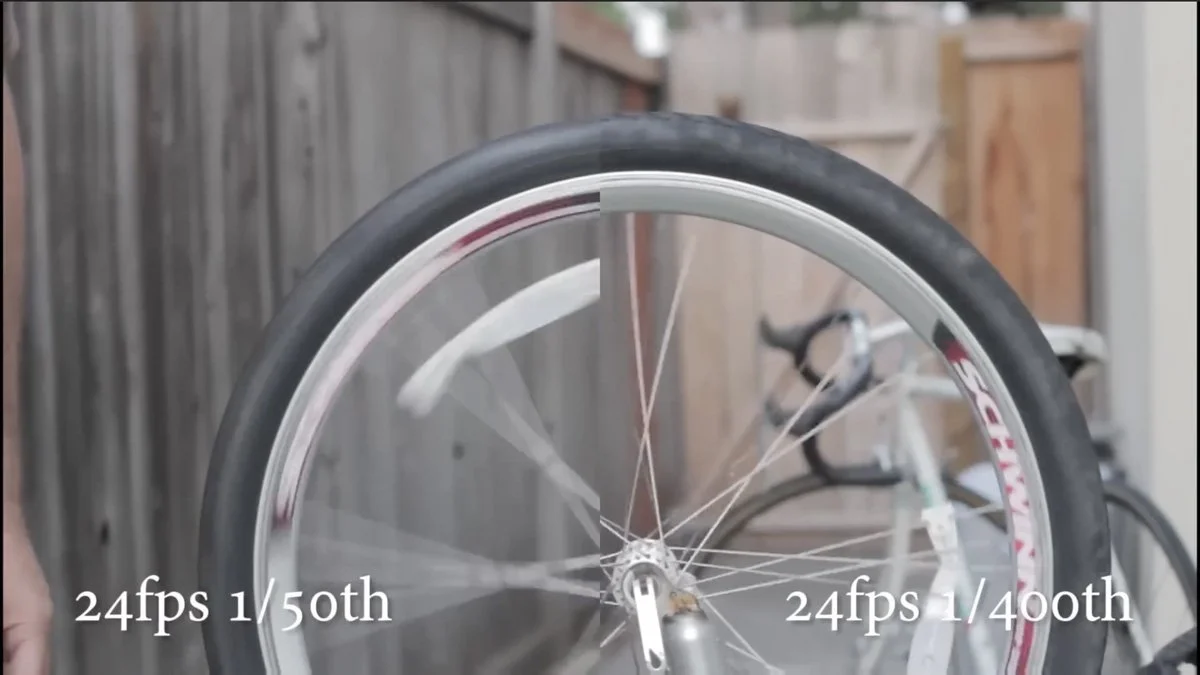
Here is a quick example from Filmmaker Central over on YouTube that illustrates the before and after effect of that motion blur in your footage.
The slow shutter usually means you'll need an ND filter. The built-in ND on the X100VI typically isn’t strong enough on its own without cranking the aperture really high, so consider using a variable ND if you want to follow this rule and really treat the Fuji X100VI like a proper video camera.
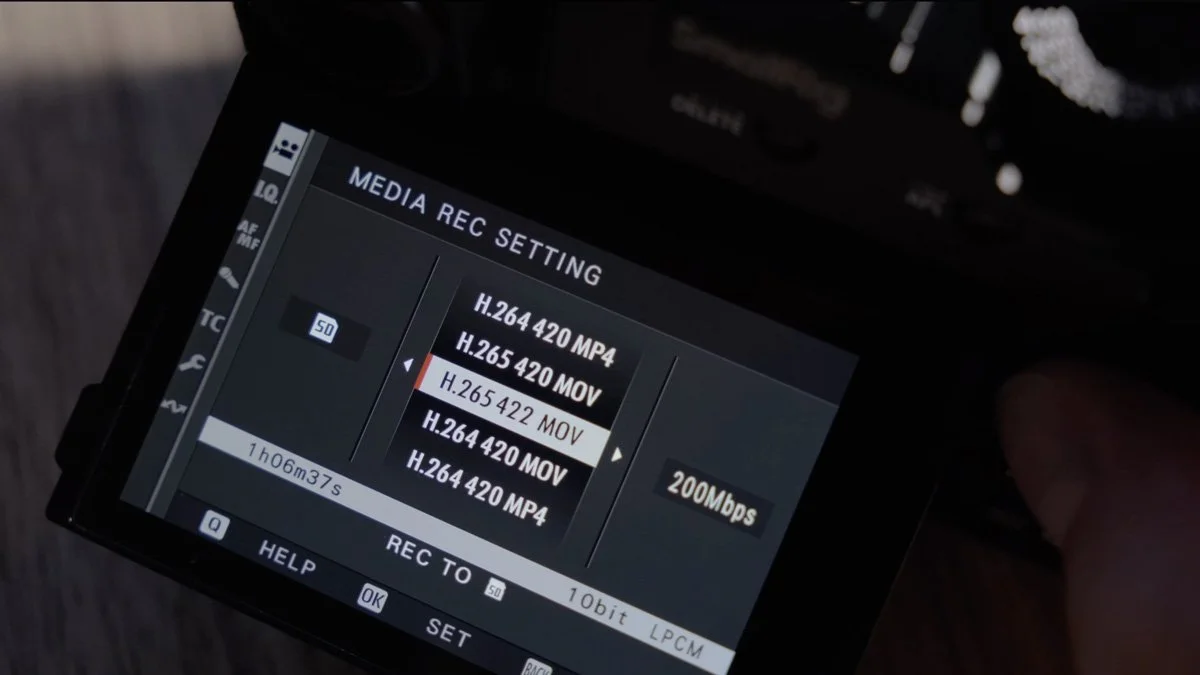
Best File Format and Bit Rate Settings for the Fujifilm X100VI
File Format / Codec
Choose: H.265 4:2:2 .MOV.
All this means is: maximum color information. If you ever want to color grade in post, even lightly, you’ll want it maxed out.
Bit Rate
Use 200 Mbps if you’re grading your footage.
More bit rate = more information = more flexibility in post.
If you’re not color grading and just using film simulations, you can drop to 50 or 100 Mbps to save on storage space.
Choose a Color Profile (Film Sims vs LOG Recording)
This is where beginners can overthink things, so here’s the simple breakdown.
Option 1: Use Fuji Film Simulations
If you want the easiest workflow and don’t plan to color grade, pick the film simulation that looks best and shoot with that. Fuji’s color science is excellent.
Option 2: Shoot LOG
You have two choices: F-LOG and F-LOG 2.
I recommend F-LOG for the X100VI.
Here’s why:
F-LOG has a lower base ISO (500) compared to F-LOG 2 (1250), which makes exposure easier on a small camera where you may not have or want a VND filter.
It’s easier to color grade, especially for beginners.
F-LOG 2 really shines at higher bit rates and on cameras like the X-H2S, not the X100VI.
If you want the simplest color grading workflow, go with F-LOG. If you’re not new to color grading, I would suggest experimenting with them both and choosing a favorite.
Wrapping Up
There’s a lot more you can tweak on the X100VI, but these core settings will get you 95% of the way to the best possible video quality from this tiny camera.
If you want to see exactly how these settings look in real footage, and get into some deeper explanations, watch the full video here: